Process of Applying for a Digital Signature Certificate (DSC)
Applying for a Digital Signature Certificate (DSC) with DSC Apply Company is simple, secure, and fully online. Just follow these easy steps 👇
Step 1: Visit the Application Portal
Click on the link 👉 c.dscapply.com
This will take you to our DSC Application Form page where you can start the process.
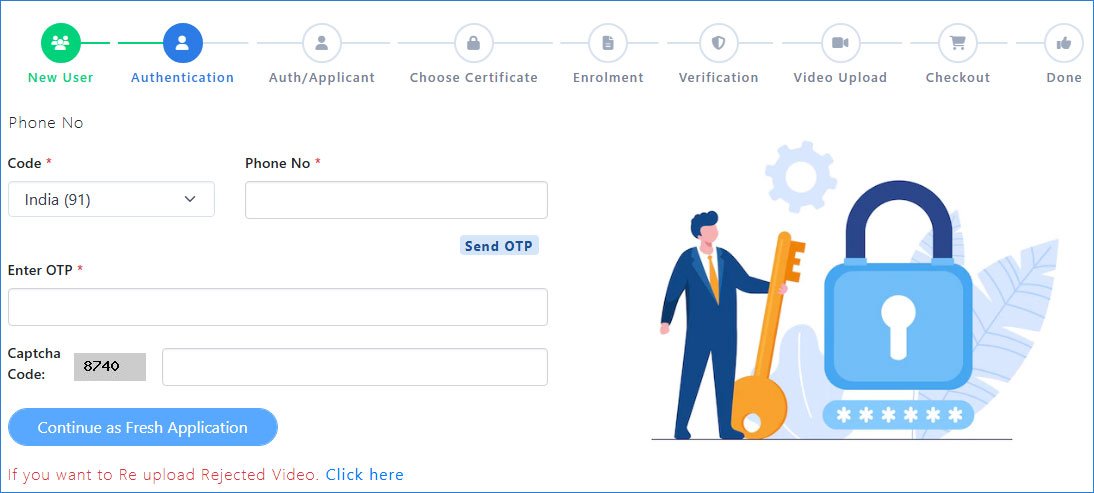
Step 2: Authentication with Mobile Number
To begin the DSC application process, you need to verify your mobile number that is linked with your Aadhaar.
- Enter your mobile number – Select your country code (India +91) and type your Aadhaar-linked phone number.
- Send OTP – Click on Send OTP to receive a One-Time Password on your registered mobile.
- Enter OTP – Type the OTP you received in the given field.
- Captcha Verification – Enter the captcha code displayed on the screen.
- Continue – Click on Continue as Fresh Application to move forward with your DSC registration.
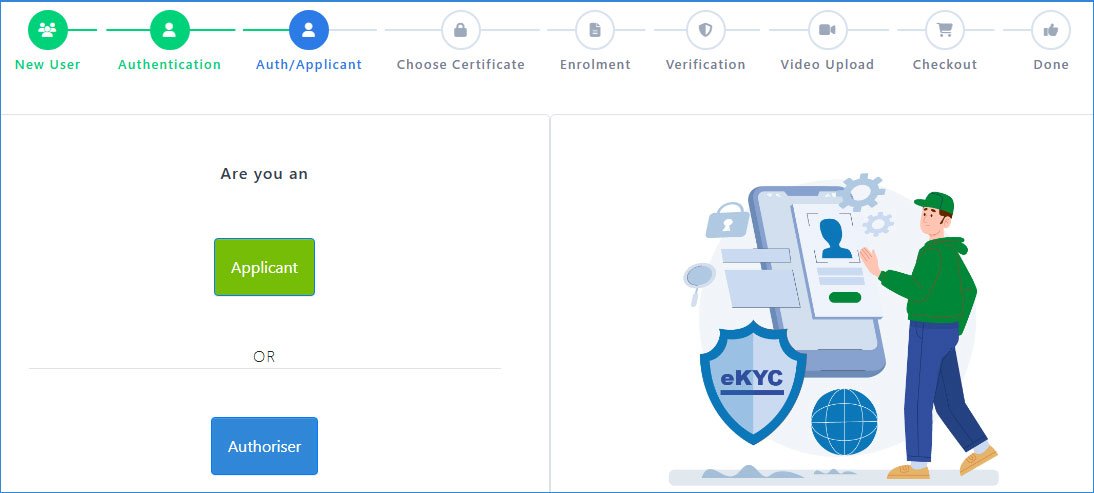
Step 3: Select Applicant Type
In this step, you need to confirm whether you are the Applicant or an Authoriser.
- Applicant: Choose this option if you are applying for the DSC for yourself.
- Authoriser: Select this if you are an authorized person applying on behalf of an organization.
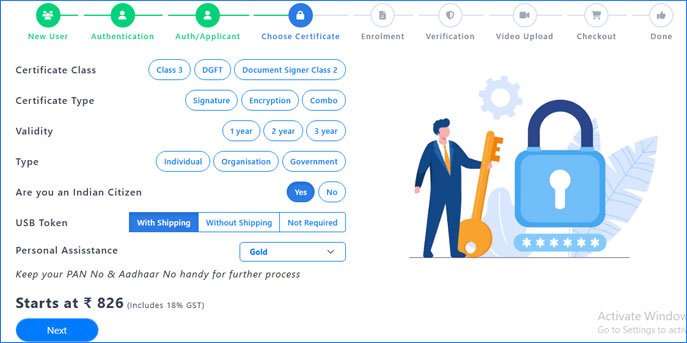
Step 4: Choose Your Certificate
In this step, you will customize your Digital Signature Certificate (DSC) as per your requirement. Carefully select the following options:
- Certificate Class – Choose from Class 3, DGFT, or Document Signer Class 2 depending on your usage.
- Certificate Type – Select Signature (for signing documents), Encryption (for securing data), or Combo (both).
- Validity – Choose the validity period of your DSC: 1 year, 2 years, or 3 years.
- Type – Select whether you are applying as an Individual, Organisation, or Government entity.
- Indian Citizen – Confirm if you are an Indian citizen by choosing Yes or No.
- USB Token – Decide if you want your DSC in a USB Token. Options include With Shipping, Without Shipping, or Not Required.
- Personal Assistance – Select the level of support you need (e.g., Gold, Silver, Platinum).
Step 5: Fill DSC Enrolment Form & Select KYC Type
In this step, you need to complete your DSC Enrolment Form and verify your identity through KYC. Here’s how to proceed:
Choose Your KYC Type – You will see multiple options:
- Aadhaar Online – Fastest method, verify instantly using Aadhaar-linked mobile number.
- Aadhaar Offline – Upload your Aadhaar XML file for verification.
- PAN KYC – Validate your details using PAN Card.
- Use Existing eKYC – If you already have a verified eKYC, you can reuse it.
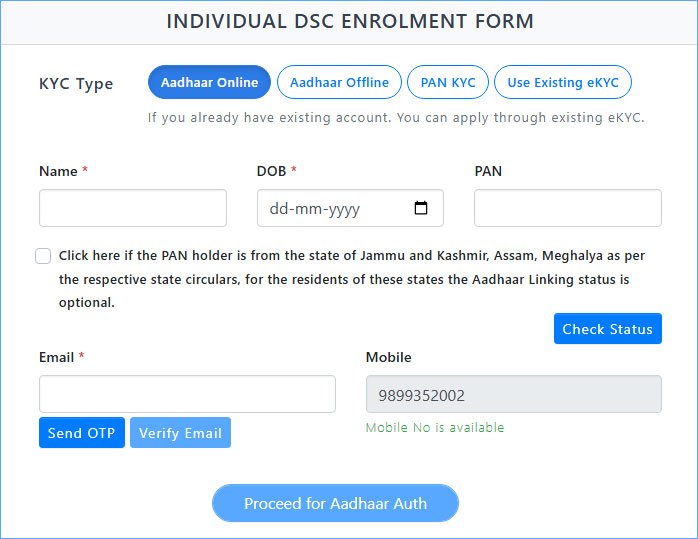
Step 5 (A): Aadhaar Online KYC
If you select Aadhaar Online as your KYC method, follow these steps carefully:
Enter Your Basic Details
- Fill in your Full Name exactly as per Aadhaar.
- Enter your Date of Birth (DOB) in dd-mm-yyyy format.
- Provide your PAN Number for verification.
- Click on Check Status to confirm if your Aadhaar is linked with PAN.
Verify Your Email
- Enter your valid Email ID.
- Click on Send OTP and check your email inbox.
- Enter the received OTP and click Verify Email.
Confirm Mobile Number
- Your Aadhaar-linked Mobile Number will be auto-fetched (or you can enter it if required).
Proceed for Aadhaar Authentication
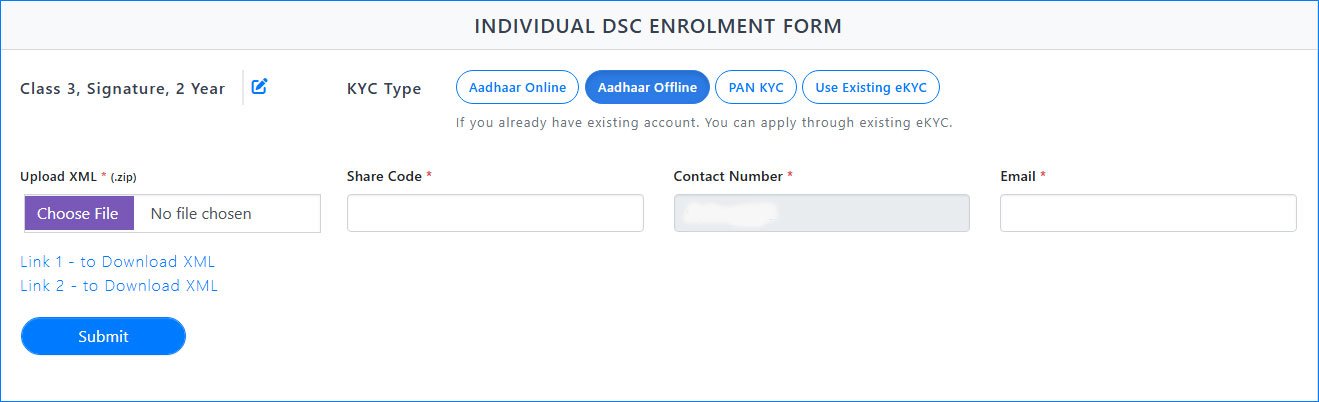
Step 5 (B): Aadhaar Offline KYC
If you choose Aadhaar Offline as your KYC method, follow these steps:
Download Aadhaar XML File
- Visit the UIDAI website and download your Aadhaar XML file.
- While downloading, you will be asked to set a Share Code (a 4-digit password).
- Save the XML file in .zip format.
Upload Aadhaar XML
- On the DSC application form, click on Choose File and upload your downloaded Aadhaar XML (.zip) file.
Enter Share Code
- Provide the Share Code you created at the time of downloading the XML file.
Enter Contact Details
- Enter your Mobile Number (linked to Aadhaar).
Provide your Email Address for communication and verification.
Submit for Verification
- Once all details are filled, click on Submit.
- Your KYC will be verified securely through the Aadhaar XML file.
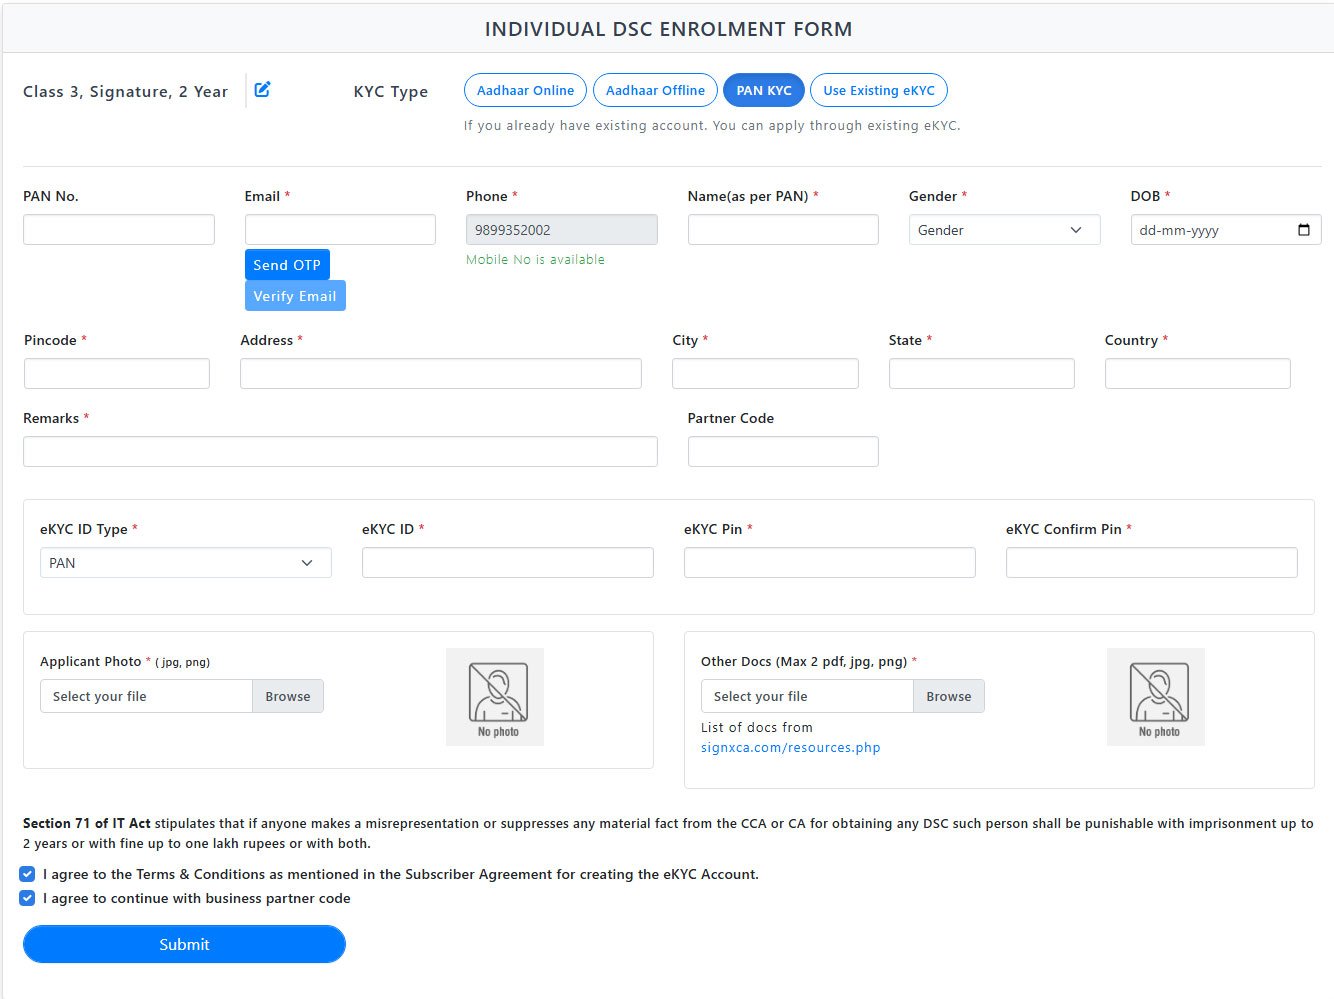
Step 5 (C): PAN KYC
If you choose PAN KYC as your KYC method, follow these steps carefully:
Enter PAN Details
- Type your PAN Number and click to verify.
- Ensure your Name matches exactly as per your PAN card.
Verify Email & Phone Number
- Enter your Email ID, click Send OTP, and verify with the OTP received.
- The Mobile Number (already linked) will be pre-filled.
Fill in Personal Information
- Enter Gender and Date of Birth (DOB) as per PAN.
- Fill your Address, Pincode, City, State, and Country.
- In Remarks, type your Full Name.
Partner Code
- Enter SP8186HRID in the Partner Code field.
eKYC Details
- Select eKYC ID Type → Choose Mobile.
- Enter eKYC ID → your registered mobile number.
- Enter eKYC Pin → 123456 and re-enter to confirm.
Upload Documents
- Upload a Passport Size Photograph (jpg/png).
Upload scanned copies of your Aadhaar Card and PAN Card (PDF/JPG/PNG, max 2 files).
Final Confirmation
- Tick the checkboxes:
✅ I agree to the Terms & Conditions.
✅ I agree to continue with business partner code. - Click on Submit.
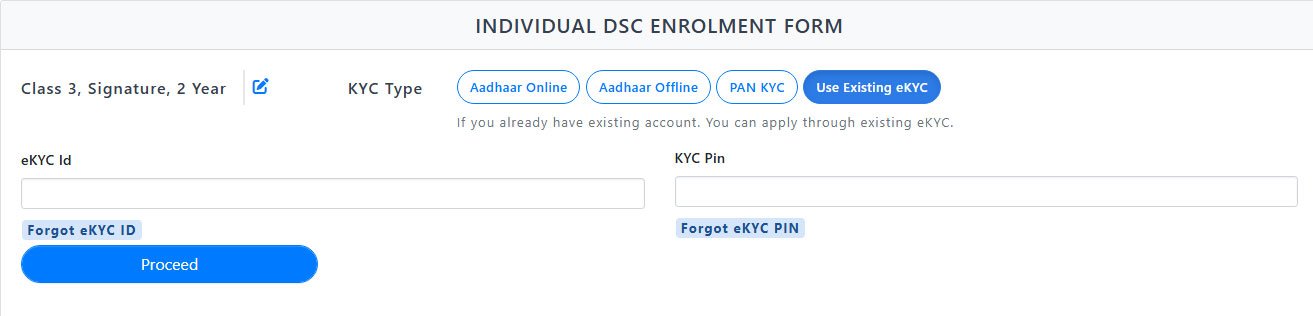
Step 5 (D): Use Existing eKYC
If you are an existing user and already have a valid eKYC ID, you can quickly proceed without filling all details again.
Enter eKYC ID
- Type your eKYC ID (issued previously).
Enter eKYC PIN
- Type your eKYC PIN (the secure 6-digit PIN you set earlier).
Submit
- Click Submit to continue the DSC enrollment process.
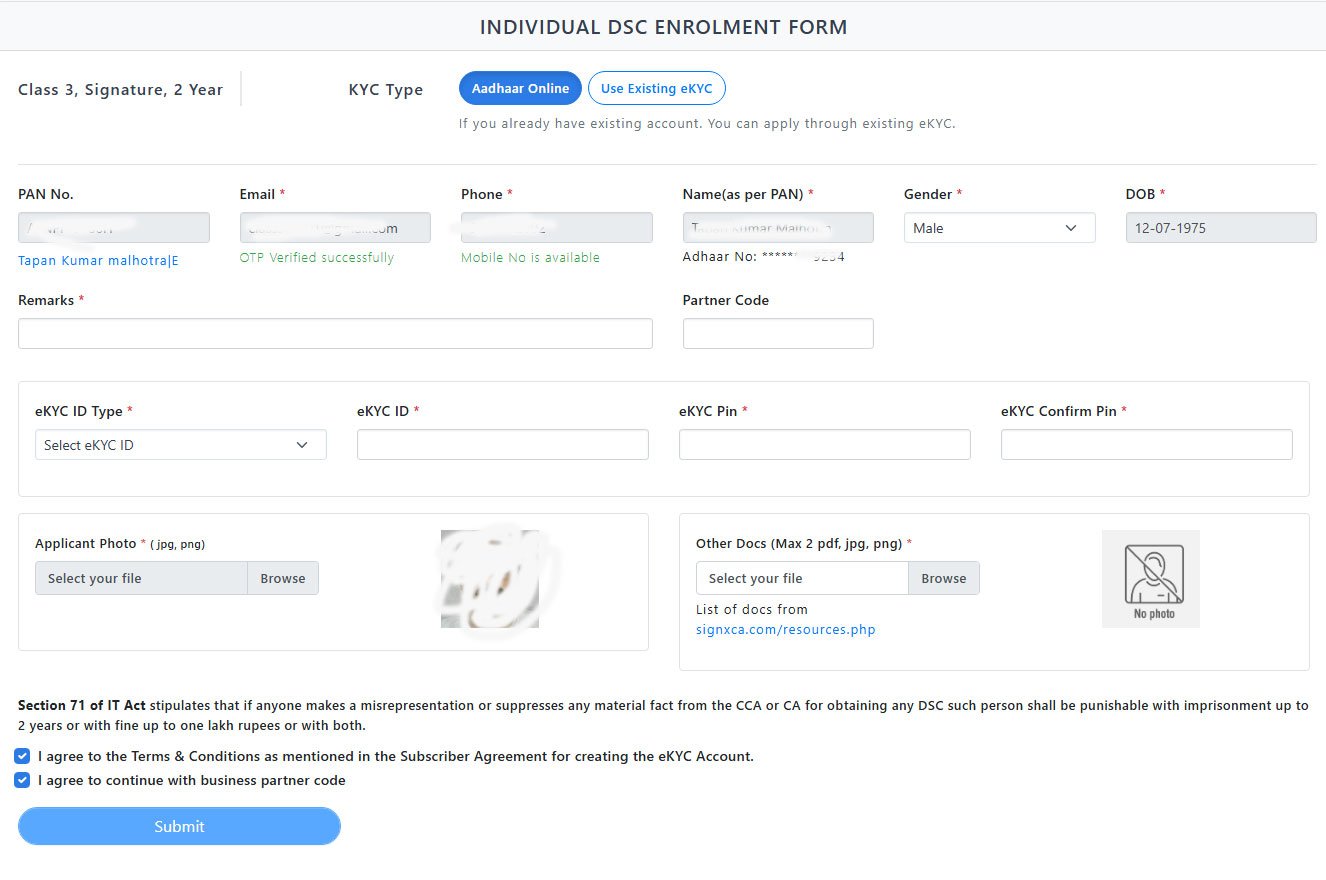
Step 6: Aadhaar Verification & Enrollment Form
Once you select Aadhaar Online or Aadhaar Offline as your KYC type, you will need to complete Aadhaar verification.
Verify Aadhaar with OTP
- Enter your Aadhaar number.
- You will receive an OTP on your registered mobile number linked with Aadhaar.
- Enter the OTP to proceed.
Enrollment Form Opens
- After successful Aadhaar verification, you will be redirected to the DSC Enrollment Form (similar to the PAN KYC form).
- Some of your details will be auto-filled from Aadhaar.
Fill the Remaining Details
- Confirm your PAN, Email (verify with OTP), Mobile Number, Gender, Date of Birth, Address, City, State, and Country.
- In the Remarks field, type your Full Name.
- In the Partner Code field, enter SP8186HRID.
Choose Your eKYC Type
- Select Mobile as eKYC type.
- Enter eKYC PIN: 123456 and confirm the same.
Upload Documents
- Upload your Passport Size Photo.
- Upload scanned copies of Aadhaar and PAN Card.
Agree & Submit
- Tick both checkboxes for Terms & Conditions.
- Finally, click on Submit to complete this step.
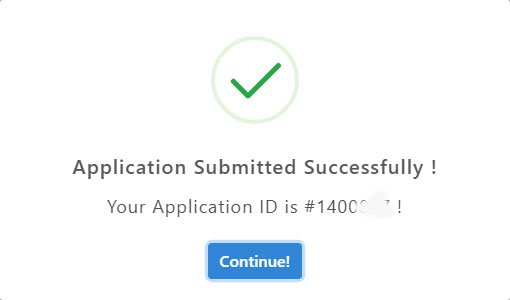
Step 7: Receive Application ID
- After successfully submitting the enrollment form, you will receive a unique Application ID on the screen.
- Copy and save this Application ID carefully – it is required for tracking and completing your DSC application.
- Please send this Application ID to us on WhatsApp at 📱 +91-9891352002 for further processing and quick approval.
Need Help?
If you face any problem during the DSC application process or have any queries, feel free to contact us:
📞 Call / WhatsApp: +91-9891352002, +91-7827423405
📧 Email: dsc@dscapply.com